
This guide will show how to edit Letters during a letter run to a group of employees, before they are then distributed.
Related guides:
- Sending a letter to a group of employees (non-editable template)
- Sending an individual letter using the Communication button
🎥Bitesize videos availableFor detailed guidance on this topic, and many others, check out Ciphr Academy. ⚠ Important: To ensure access via SSO, log in to the Academy via your HR system first. Once logged in, you can access the Letters and Personal Documents videos here: |
Contents
- Letter properties
- Sending and editing letters for a subset of employees
Letter properties
- Template letters can be created and stored in HR and generated via mail merge to send to employees
- Each letter in the Letter Library has a set of Properties attached to it which determine what happens when a letter of that type is run
- One of the available properties is the Can Edit Document option. This will enable some or all of the employee documents produced to be edited prior to being uploaded
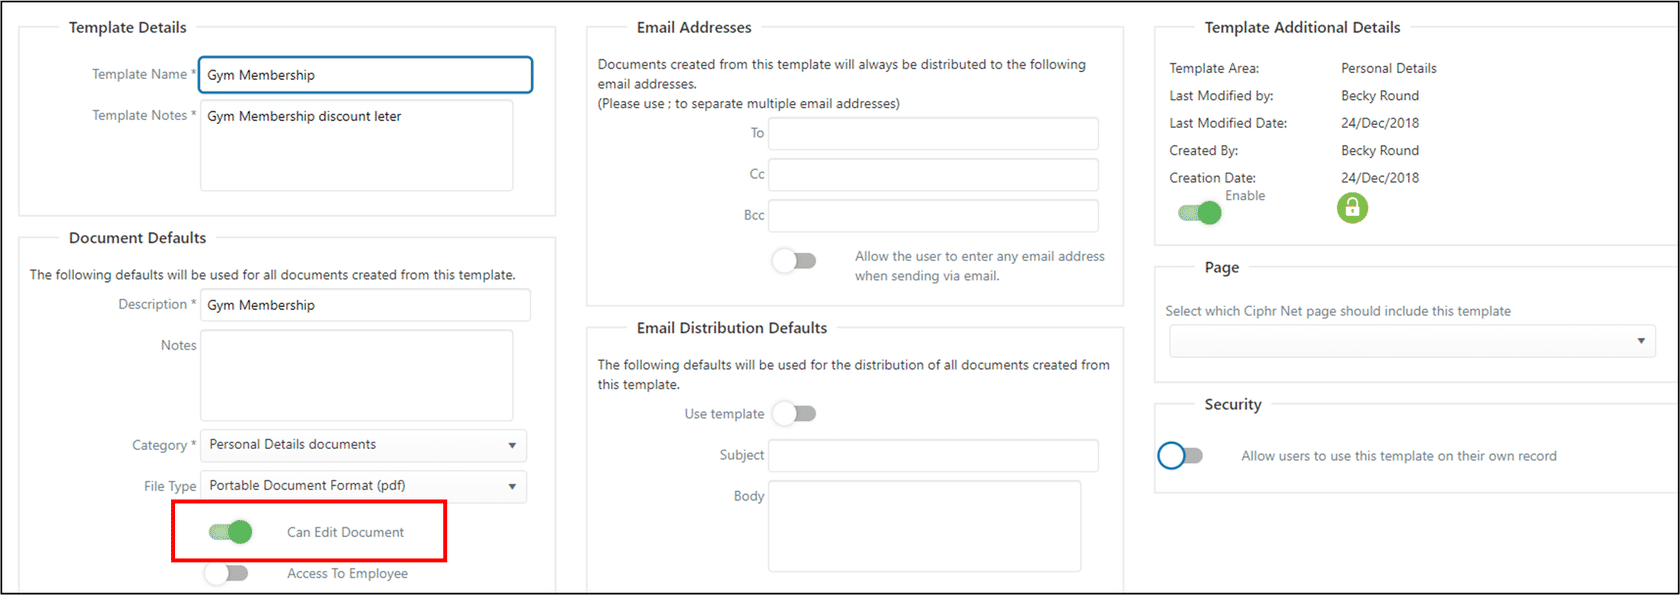
- Create the letter in the normal way and in the properties select Can Edit Document
Sending and editing letters for a subset of employees
- There are two points where you can edit a letter shown in the summary workflow below:
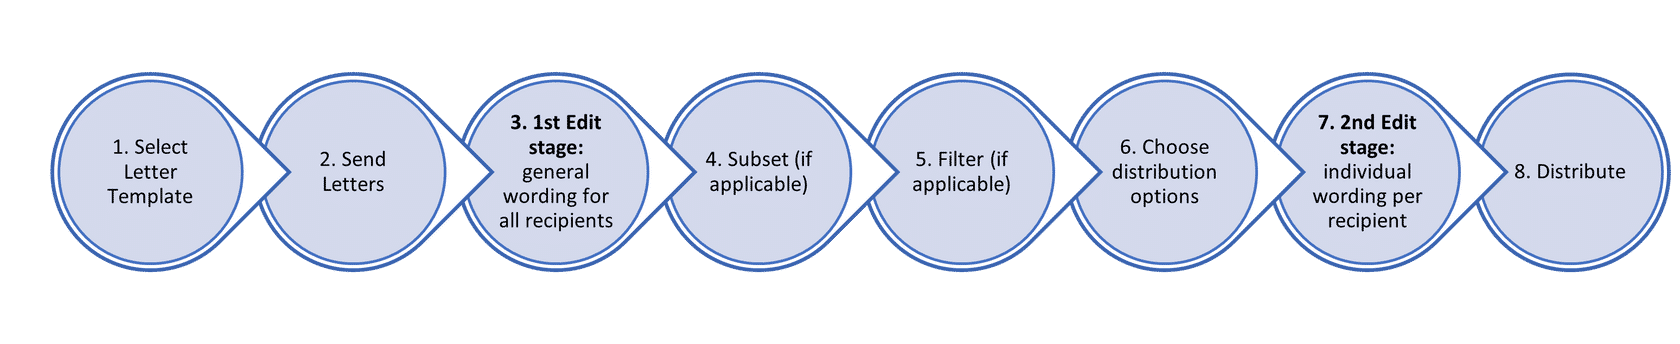
- We'll now go through the full process in detail:
Step 1 - find template
- Find the letter that you want to send, go to the following area:
- Latest (left-hand) menu: Employee Communications > Letter Library & Distribution
- Pre-2025 (top) menu: Letters > Letter Store
Step 2 - click send letters
- Click on the letter name and then select Send Letters from the list of actions presented
Step 3 - general wording edit for all recipients
- At this point the letter will be displayed with three icons in the top right of the page. Each one has a tooltip if you hover over it
- The arrows allow you to download the existing template to amend the general wording, then reupload for this particular letter run
- This stage should only be used to make general wording amendments for all recipients in the subset, as individual amendments can be made at a later stage (7). Therefore if you are processing a letter via the Communication button for one record you can bypass this stage
| Note: You cannot amend the field mappings on the template, only the wording, and any amendments will not be saved for future letter runs. To amend the mappings and/or save changes for future runs, refer to the linked Editing letter templates help guide. |
- Click the Send icon
Step 4 - choose subset
- Click Subset and create the group of employee records to receive the letter. Add and remove employees from and to the subset as required and then click Complete and Finish
- Having created the subset those records will then be displayed on screen
| Note: For more details on creating Subsets see the linked help guide. |
- Click Continue
Step 5 - further filter
- An option to use a filter form will be presented which enables further refinement of the selection of records. More information on filter forms is available in the linked guide, but for the purposes of this example click Continue With No Filter
- The employee list of recipients will be presented. If no changes are to be made to the subset of records then click Continue
Step 6 - choose distribution options
- A further screen will be presented relating to the distribution options for this letter, select as required
Step 7 - generate draft letters for individual checking/editing
- The letter creation process will take place and the letter recipients will be displayed on the Run Letters page
- For the purposes of making edits to some or all of the letters this can be done either one at a time, using the Download option to the left of the employee name or the Bulk Download option will download the letters for all employees in the subset (see next section)
|
Important:
|
- If you need to leave the page at this stage, to return to your draft queued letters later, go to the following area:
- Latest (left-hand) menu: Employee Communications > Letter Queue > Requires Action Tab
- Pre-2025 (top) menu: Letters > Letter Status > Requires Action Tab
Clicking into the letter gives you three options:
- Preview to return to the Run Letters page
- Delete to remove the draft completely
- View Employees – to check who is in the Subset
| Note: The default retention period of letters in the Letter Status area is 7 days but can be amended by contacting Customer care. |
Bulk download
- Click Bulk Download
- Letters for all recipients will be downloaded into a zip file which will be displayed on screen
- Each of the letters will be listed in the zip file presented
- Double click on a file as required and then make any edits to the letter content
- Save the file to a location of your choice which is outside of the zip file
| Note: It is ESSENTIAL that the name of the file remains unchanged. |
- Continue to make changes to any of the other documents in the zip file as is required ensuring that the document is saved with its name unchanged
- Once all the documents which require changing have been edited and saved click Bulk Upload
- Navigate to the location where the newly edited documents have been saved and select the files. Hold the ctrl key on the keyboard and click once with the mouse on each file in turn to select multiple files
- Or, if there are lots of documents, pressing ctrl and A will highlight all files within the folder. Holding down ctrl you can then unselect individual files if required
| Note: The maximum number of files you can upload is 100. |
- Click Open
- The files will be matched with the original by its unique identifier and confirmation of a successful upload will be presented. Click OK
- Files which have been uploaded will have a green tick displayed in the Document Uploaded column
-
The documents can then be distributed by clicking Distribute

|
Note: If you have downloaded letters, leave the page and return later, you will notice the Bulk Upload button is not visible. Click any of the Download buttons on the page to trigger the process and the Bulk Upload button will appear so you can add your revised documents.
|
Single letter download
- Click the Download button which is alongside the name of the employee whose letter is to be changed
- The letter will be downloaded and can then be edited as required
- Save the file to a location of your choice which is outside of the zip file and ensure that the name of the file remains unchanged
- This can be carried out for as many letters as are required to be changed
- Once complete click Bulk Upload
- Navigate to the location where the newly edited documents have been saved and select the files. Hold the ctrl key on the keyboard and click once with the mouse on each file in turn to select multiple files
- Click Open
- The files will be matched with the original by its unique identifier and confirmation of a successful upload will be presented. Click OK
- Files which have been uploaded will have a green tick displayed in the Document Uploaded column
- The documents can then be distributed by clicking Distribute
| Note: By downloading, editing and uploading the documents it is only the letter for that employee that is being changed. The letter templates are not being modified. If you want to update the general wording of the template for this run only you can do this at step 2 as detailed above |
|
Note: If you have downloaded letters, leave the page and return later, you will notice the Bulk Upload button is not visible. Click any of the Download buttons on the page to trigger the process and the Bulk Upload button will appear so you can add your revised documents.
|
Step 8 - distribution
- Once you have clicked Distribute, the letters will be uploaded and processed according to the settings selected in the letter template. The document will be saved in the person’s Personal Documents area (if you chose to save a copy)
- You can view a history of previously distributed letters (History Tab), as well as returning to draft letters (Requires Action Tab) via the following area:
- Latest (left-hand) menu: Letters > Letter Queue
- Pre-2025 (top) menu: Letters > Letter Status
| Note: You will only be able to see the letters that you have generated. |
Footer
Comments
0 comments
Article is closed for comments.