
This guide explains how to navigate HR in the mobile version, which uses a simplified layout to highlight key pages and ensure a user-friendly experience on smaller screens.
Contents
- Overview
- Access
- Login and home screen
- Time Off
- Documents
- Policy Acceptance
- See Who’s Off
- Employee Directory
- Verifications
- Reports
- Pay Documents
- Further menu options
Overview
- Your HR system can be used on mobile devices enabling users to review and record information at times and in places to suit them, such as employees who are not office-based with no access to a desktop machine
- The mobile menu provides easy access to the most frequently used pages; however, full site access is also available via the Desktop version covered later in this guide
| Note: The mobile view is accessed via an internet browser using your usual HR URL (web address) so is not a mobile app and therefore no download is required. |
Access
- To access the mobile view, copy or type your system URL (web address) into the internet browser address bar on your mobile device
- Eg: https://yourcompany.app.ciphr.com/ - ensure the full link is used including the https://
- When the page has opened it is recommended to Add to home screen to create a shortcut for easy access. Guidance will pop up when first logging in to help you set this up
|
|
Note: The default logo is Ciphr but can be changed to your own logo within the Sign-in Admin Branding configuration. |
Login and home screen
- Enter your email address and then follow your usual login method (eg password or Single Sign On (SSO))
- The options you see once logged are dependent on your user role access
- A Dashboard will be displayed with a shortcut to Book absence
- Other areas can be accessed via the burger menu dropdown in the top right of the screen – see later in this help guide
- Manager users may also see Verifications to process
|
Notes:
|
Time Off
- Three tabs will show All absence or you can view any days Approved or Pending
- Click on an existing absence to view more details, the details are displayed over three tabs
Add an absence
- Click the Book absence shortcut from the home page or click on the top right menu and click Holidays & Absence > Add absence
- Press the dropdown to select the Absence type
- The options presented vary according to the type of absence selected. Click Next to continue
- On the the Date tab, use the calendar icons or type to select/enter the Absence start and end dates
- Then scroll down to customise as needed:
- Shift start - first half only
- Full day - default
- Shift end - second half only
- Clicking the options will amend the times accordingly (for multi-day absence, the half options are only available at the beginning and end of the dates).
- Or if the user is on a flexible working work pattern (CIPHRFLEXI code) then the partial day buttons are not visible and the times that were due to be worked each day must be recorded - see note below
- Click Next to continue
- The Additional info tab contains the Notes box and an option to add a document such as medical appointment, fit note etc (subject to your system configuration - see guide for more details)
- Click Submit to save the absence which will then be sent for verification (subject to the page/user role permission settings)
- Or click Submit and add new to save and enter another absence
|
Note: Only users on a CIPHRFLEXI pattern should log their hours. Users with a regular work pattern can only record partial days (first/second half at the beginning/end of an absence) Clicking on a time will open the clock so the time can be set (view may vary depending on your mobile device) For more information on recording Time Off please see the linked guide. |
Documents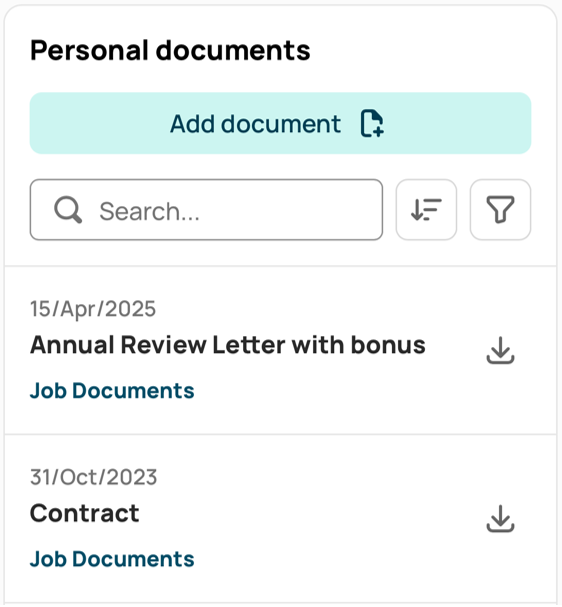
- Personal Documents can be viewed and downloaded from here - see linked guide for more details
- There are search, sort and filter options for easier selection
- Add document can be used to upload a photo or file from your device (subject to page permissions)
Policy Acceptance
- Policies can be viewed and downloaded from here - see linked guide for details on how to configure
- There are search, sort and filter options for easier selection
- The Pending tab will show any policies requiring your attention
- Policies will either be available to download or as a link depending on how the document was configured
-
Once the policy has been downloaded/viewed via link, the Accept policy button will become enabled so you can action
See Who’s Off
- Find out who is absent across the Global organisation or within your Team (subject to page permissions) by clicking on the relevant tab
- The information icon displays a Key. Absence reasons are not specified to protect sensitive information - see who's off charts guide for more details
Employee Directory
- Use the directory to search for colleagues and view information
- Click on a person to see more information - see Employee Directory configuration guide for details on what you can display
- You may be able to add Reward Points subject to configuration - see linked guide for more details
- Manager can be clicked on to go to that person
- Contact details will open the relevant function on your mobile to easily call or email the person
Verifications
- Managers can view and action requests from subordinates in mobile view
- These can be accessed from the dashboard shortcut or by going to the page in the menu
- Click to expand the verifications detail and then Accept or Decline as required
- See Verifying Data Changes guide for more details
Reports
- This displays the Scheduled Reports Inbox page to view any reports that have been distributed via the Report Scheduler
- See the linked guide for more details on scheduled reports
Pay Documents
- Pay related documents will display here if configured (add-on functionality - see linked guide for more details)
- You can search for document names (eg P60)
- Click the arrow icon to download and view the corresponding document
Further menu options
- The left-hand menu bar may display other options such as External links (see linked guide for more details) which you can click on in the usual way
- Click on your picture/initials icon bottom left to see further options:
Language location dropdown
- If the country location dropdown is enabled (add-on functionality), then this can be changed to the user's preferred language to show translated text - see linked guide for more details
Personal profile
- Press on your picture/initials in the bottom left-hand corner to see your personal account login details
- Login history displays at the bottom of the page and if you log in with a password (not SSO) you can change it here
Sign in Admin
- Users with a Sign-in admin global/group admin licence will see the page here - see linked guide for more details
Desktop version
- The Desktop version provides full access for pages and functionality not covered by the mobile menu
- The view will be smaller but can be zoomed in/out as per normal browser controls and is useful for larger mobile devices
- Click on your picture/initials icon bottom left again to see the Mobile view to switch back
Log out
- To exit the HR app
- Click to go Back to login to gain access again
Footer
Comments
0 comments
Article is closed for comments.