
This guide will show you how to configure Live Chat.
Contents
- Overview
- To access the Live Chat Portal
- Settings
- Feedback settings
- SLAs
- Resolutions
- Topics
- Topics - Multi Entity
- Agent Management
Overview
- Live Chat enables users to communicate with and ask questions about a preconfigured range of HR topics that they may need assistance with
- Designated users are assigned as Agents on Live Chat and they will then respond to the questions
- Some settings have interdependency on each other so this guide provides the suggested order of configuration
| Note: Live Chat needs to be enabled on your HR system before it can be used. Page access to the Live chat portal needs to be granted to the relevant user roles who will deal with queries, but if the page is not visible in Role Management then please raise a request to have it enabled. |
To access the Live Chat Portal
- Go to Employee Communications > Live Chat Portal
Settings
- Click on the General Settings tab
- Live Chat Enabled? allows you to turn off the Live Chat icon until all configuration settings have been completed. Once enabled the chat icon will appear in the bottom right of the screen
- Here you are able to configure the days and hours of operation for the Live Chat service and when set to Offline you can set up an Offline Message
- The message will display as a pop-up when Live Chat is accessed but is offline
- The Service Status ultimately determines whether the service is available and will override the configured times
Note: For more details on Using Live Chat see the related help guide.
Feedback Settings
- Click on the Feedback Settings tab
- For each of the questions, set the slider to determine whether the question is to be used and enter the text that you wish to be presented to the user
- Click Update to record the changes
- These questions will be displayed when the call is closed
SLAs
- SLAs (service level agreements) are the periods of time that can be used to apply to Topics (covered later)
- Exceeding the SLA will result in the chat being escalated which triggers an email to the address set in any related Topics
- Click Add new record to enter a new SLA or click on Edit to modify an existing one
Resolutions
- Resolutions are the outcomes from a chat when it has been concluded
- Click Add new record to enter a new Resolution or click on Edit to modify an existing one
Topics
- Topics are the subject areas that the call can be about; eg Holiday, General question etc
- Click on the Topics tab – any existing topics will be displayed. Clicking on the topic will display the configuration for the topic
To add a Topic
- From the Summary view click Insert New Record
- Enter a Topic Description
- From the dropdown lists select the Topic First Response SLA and the Topic Closure SLA. These represent the time limits that the topic should first be responded to and closed by
- Topic SLA Email Address is the email address that will be the escalation point for chats that have not been responded to and or closed within the SLA time
- Select the Assigned Agents. An agent can be assigned to multiple topics
- Finally choose the Resolutions that can be applied to this topic
- Topic Ceased Date can be used if you only want to make a topic available for a period of time and then discontinue its use
| Note: It is recommended that you set up SLAs and Resolutions prior to creating Topics. |
Topics - Multi Entity
If you have the optional Multi Entity configuration enabled, you can assign Topics to Entities so they will only be visible to the relevant employees.
To assign a Topic to an Entity
- Go to Settings> Topics
- A column on the right shows a Multi Entity button for each Topic so you can click to apply restrictions
- Click the Multi Entity button against the topic you wish to restrict
- Click on the relevant entities in the chart that should be associated with this topic
- Scroll down using the side bar scroller to click Update to save your changes
|
Note: Existing call visibility will not be affected by restrictions but if you attempt to remove an entity from an existing topic where there are related open calls (ie a caller is attached to the entity) you will receive the message below and the entity will automatically be reassigned. 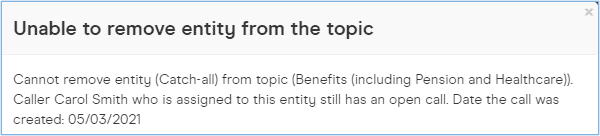 All related calls must be closed and then the topic can be unassigned from certain entities as required. |
Agent Management
- Click on the Agent Management tab
- Here you are able to set up the users that will be acting as the call agents responding to questions
- You can assign Topics to the users and determine what they are able to access on the portal
To add an Agent
- Click Insert New Record
- From the dropdown list select the person who is to be an Agent
- Then select the Assigned Topics. These need to be configured on the Topics tab. This determines which questions are sent to which Agent. An agent can have multiple topics assigned to them
- Finally go on to set the Permissions. The settings here determine what menus can be accessed in the Live Chat Portal
| Note: For more details on navigating around the Live Chat Portal see the related help guide. |
Footer
Comments
0 comments
Article is closed for comments.