
This guide explains how to build a report to identify any bespoke Further Information (FI) Fields that have been added to your system. For more details on configuring FI fields see the linked guide.
Contents
Introduction
- It may be the case that over time Further Information Fields have been added to your HR system. They will probably have 'blended in' to the system and be in day to day use but it may be beneficial to be able to identify them so you know what are 'standard' fields and which are the ones that have been added
- You can build a report to identify your FI fields (report designer licence required)
Building the report
- Go to Reporting > Report admin > Report Designer and select Insert New Record and select to Design a New Report
Follow these steps along each page of the wizard:
- Step 1 - Select Further Information Fields as the master table on the left-hand side of your screen and insert the fields listed as below
| Table | Field name |
|---|---|
| Further Information Fields | Field Name Heading Order Tab Table Name |
| Pages | Base Table Name Page Description Page Name |
| Note: Once you have selected Further Information Fields as your Master table, do not change it. The other table you need can be found in the list on the left hand side of the screen. |
Click Next to move through the steps:
- Step 2 - You do not need to select any data rules
- Step 3 - Do not include an additional table
- Step 4 - Do not include a subset filter
- Step 5 - Do not include a filter form
- Step 6 - Finish your report by giving it a name and saving it into the System Report Group
Creating a report in Excel
- An Excel spreadsheet will be downloaded and available for selection from the bottom of your screen. Click on it to open
- The downloaded Excel document will have 3 worksheets included. Click on the worksheet tab labelled Base Data. The spreadsheet contents will vary dependent on the number of Further Information Fields configured in your system, however the headings will certainly be the same and should resemble the image below:

- Rename some of the column headings as follows. This is cosmetic but will make the information more easily understood
| Heading Name | Rename To |
|---|---|
| Page Description | Page on which displayed |
| Order | Order on tab |
| Heading | FI Heading |
- Refresh the data
- On the report table add the fields to Row Labels in the following order:
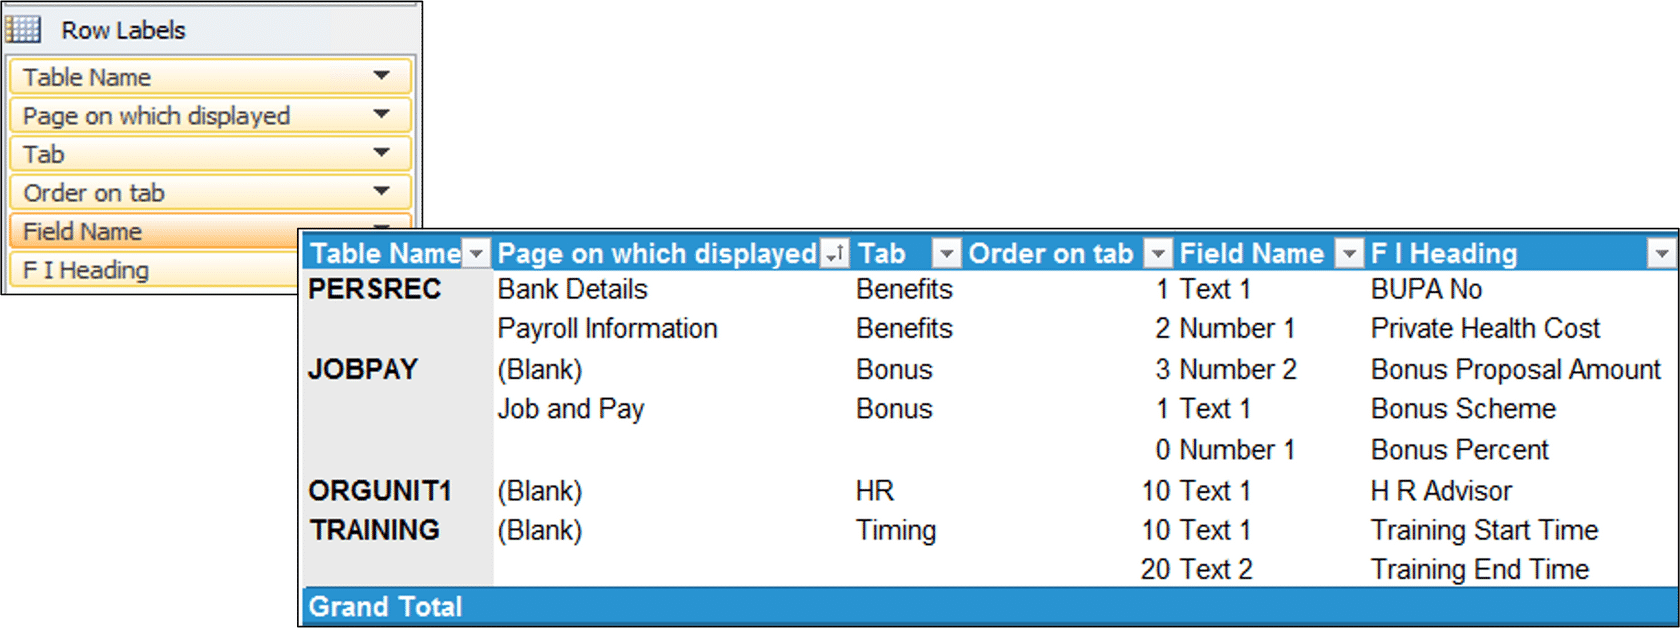
To format the report
- On the 'Table Name' column right click and go to Field Settings and then click on the tab Layout & Print
- Tick the option to Insert blank line after each item label
- Click OK
- On the field 'Page on which displayed', right click. Go to Field Settings and then click on the tab Layout & Print
- Tick the option to Repeat item labels
- Click OK
- On the field 'Tab', right click. Go to Field Settings and then click on the tab Layout & Print
- Tick the option to Repeat item labels
- Click OK
- On the field 'Page on which displayed', overtype one of the '(Blank)' values with 'Not Displayed'. This will replace (Blank) for all records
- Finally set the sort order on the 'tab' column to be smallest to largest which will alpha sort the data
- Save and check in the report in the usual manner
|
Note: You will need to ensure that access to the report is given to the required user role(s). Within Role Management select the Report option, click on the name of the new report and then make it Accessible. |
Footer
Comments
0 comments
Article is closed for comments.